Caris Bros Jewellers: The deadly diamond heist on Hay Street Mall, 1935
Object story
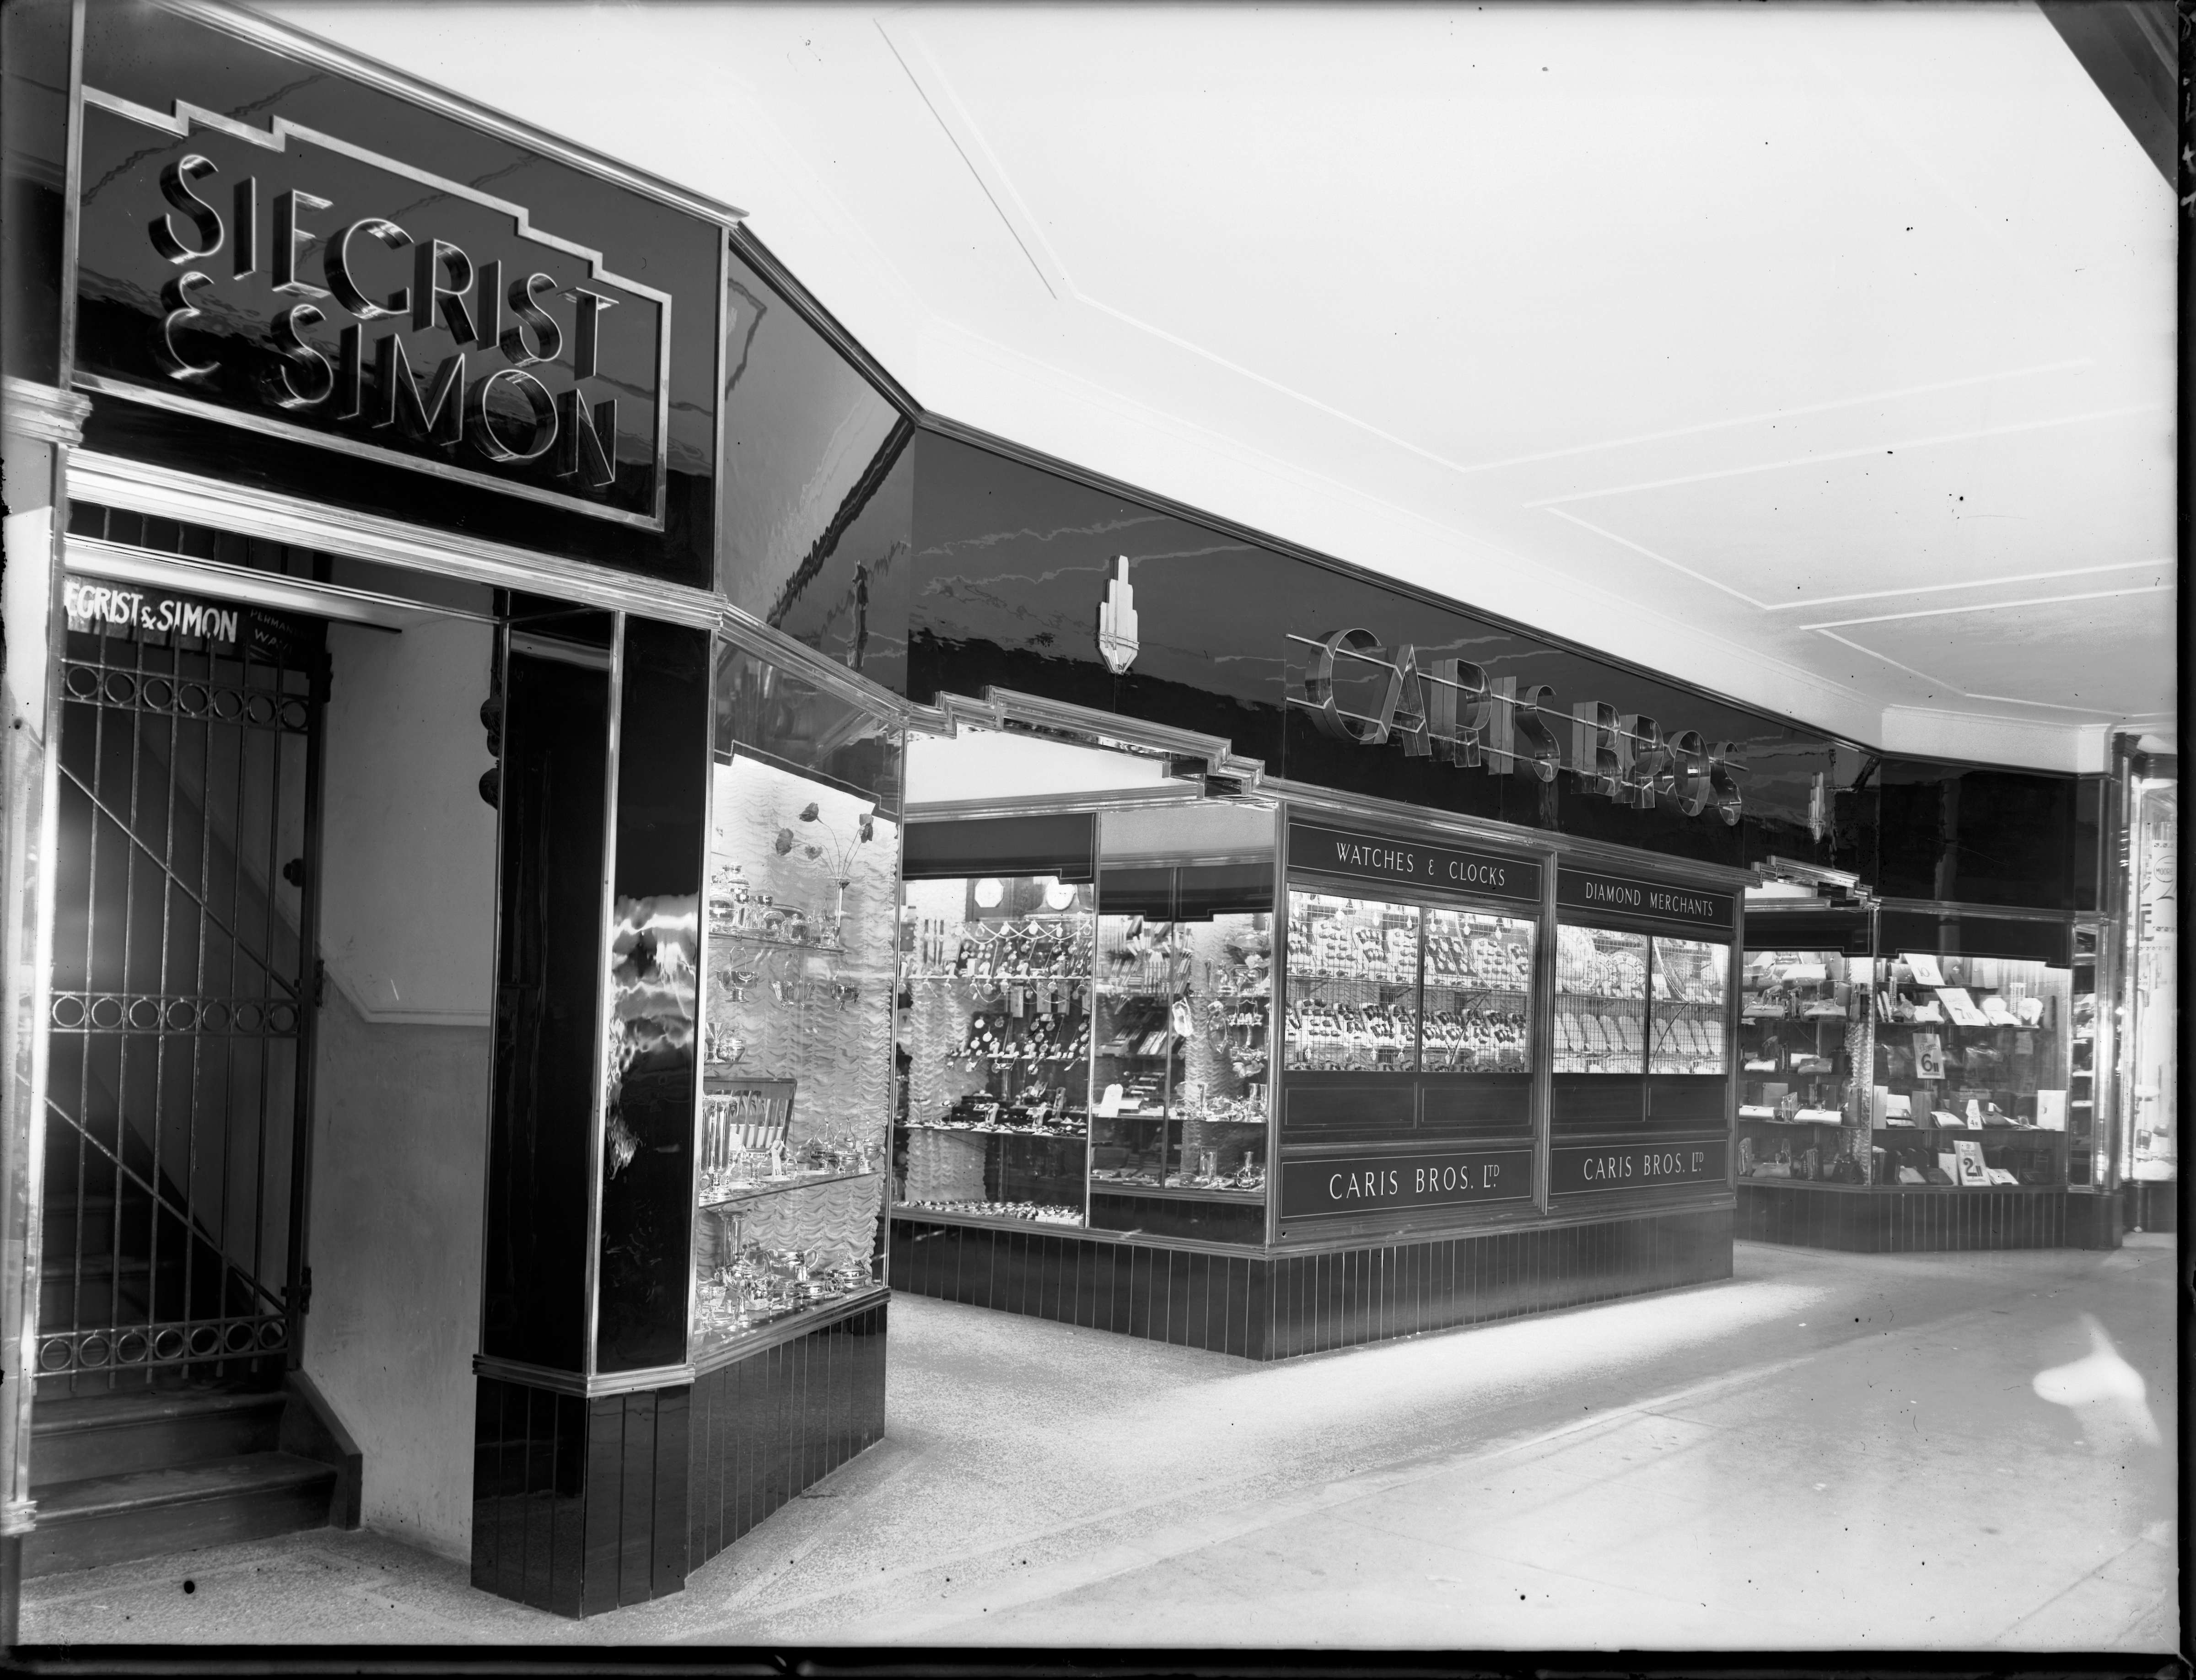
Caris Bros Jewellers
The deadly diamond heist on Hay Street Mall, 1935
On February 5th, 1935, the body of sixty-year-old nightwatchman Edgar Arthur Whitfield was discovered inside the Caris Brothers’ Jewellers shop on the Hay Street Mall after an anonymous call to police. His murderers had made off with £5000 in diamonds—equivalent to over half a million dollars today.
This letter, addressed to the Caris Bros’ jewellers, is dated April 15th 1935, the day the inquest into the death and heist was formally opened. The investigation led police to arrest forty-four year old tailor Charles Silverman, and three other men in their mid-twenties: barman Matthew Walsh, electrician Stanley Thomas Flynn, and labourer Cyril ‘Brickie’ Brennan.
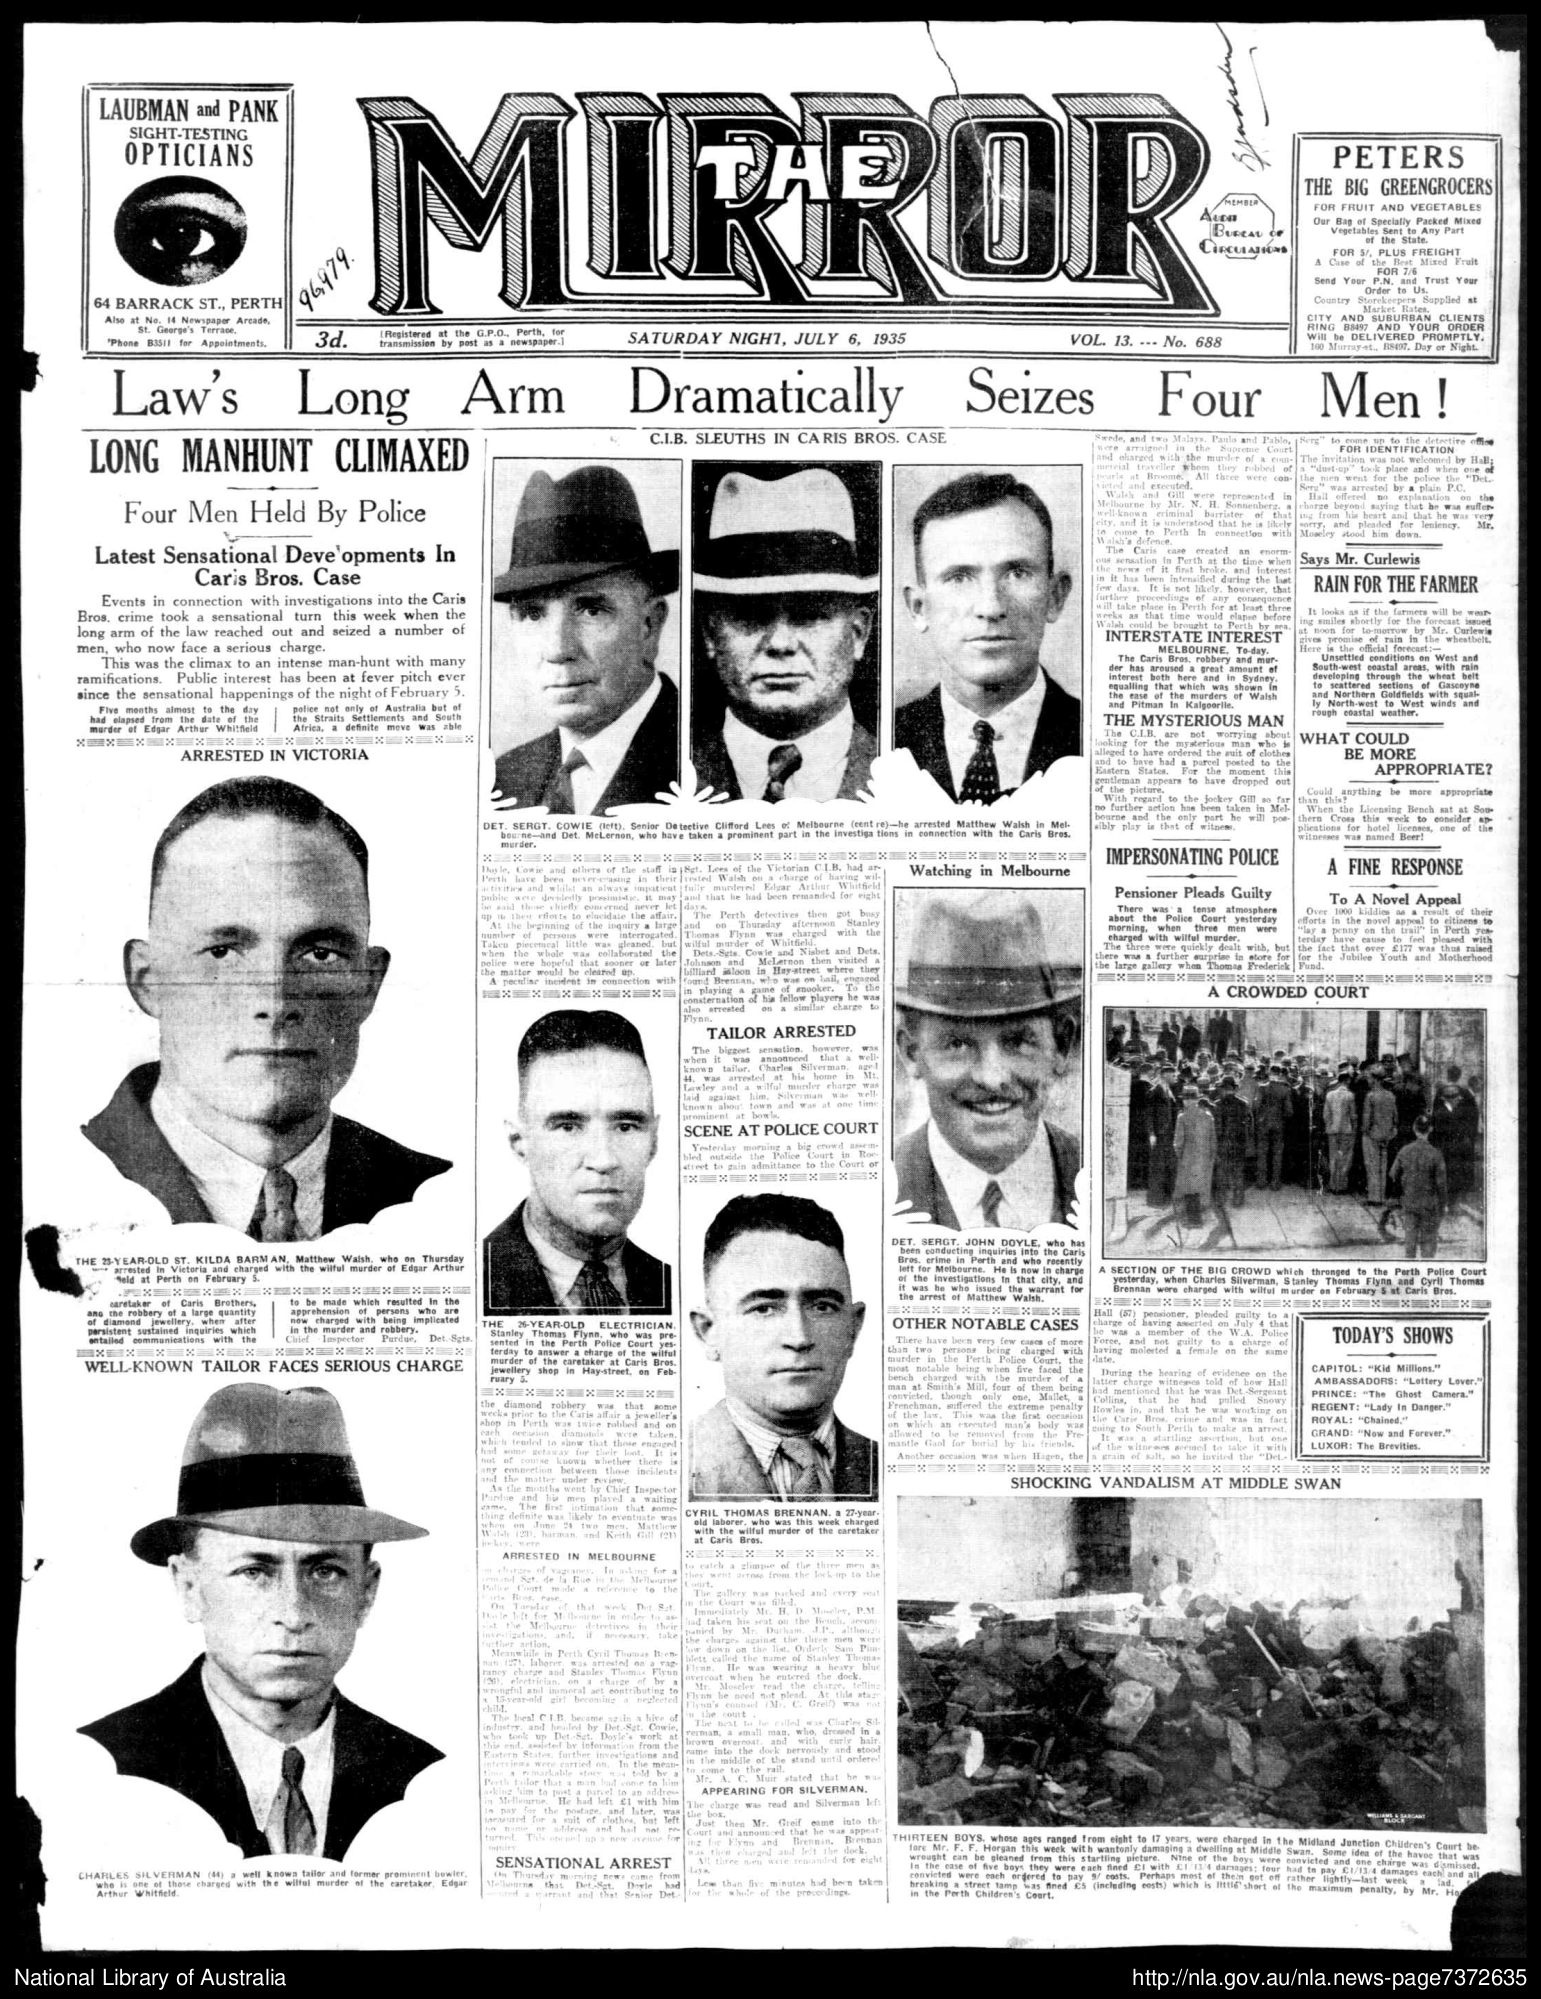
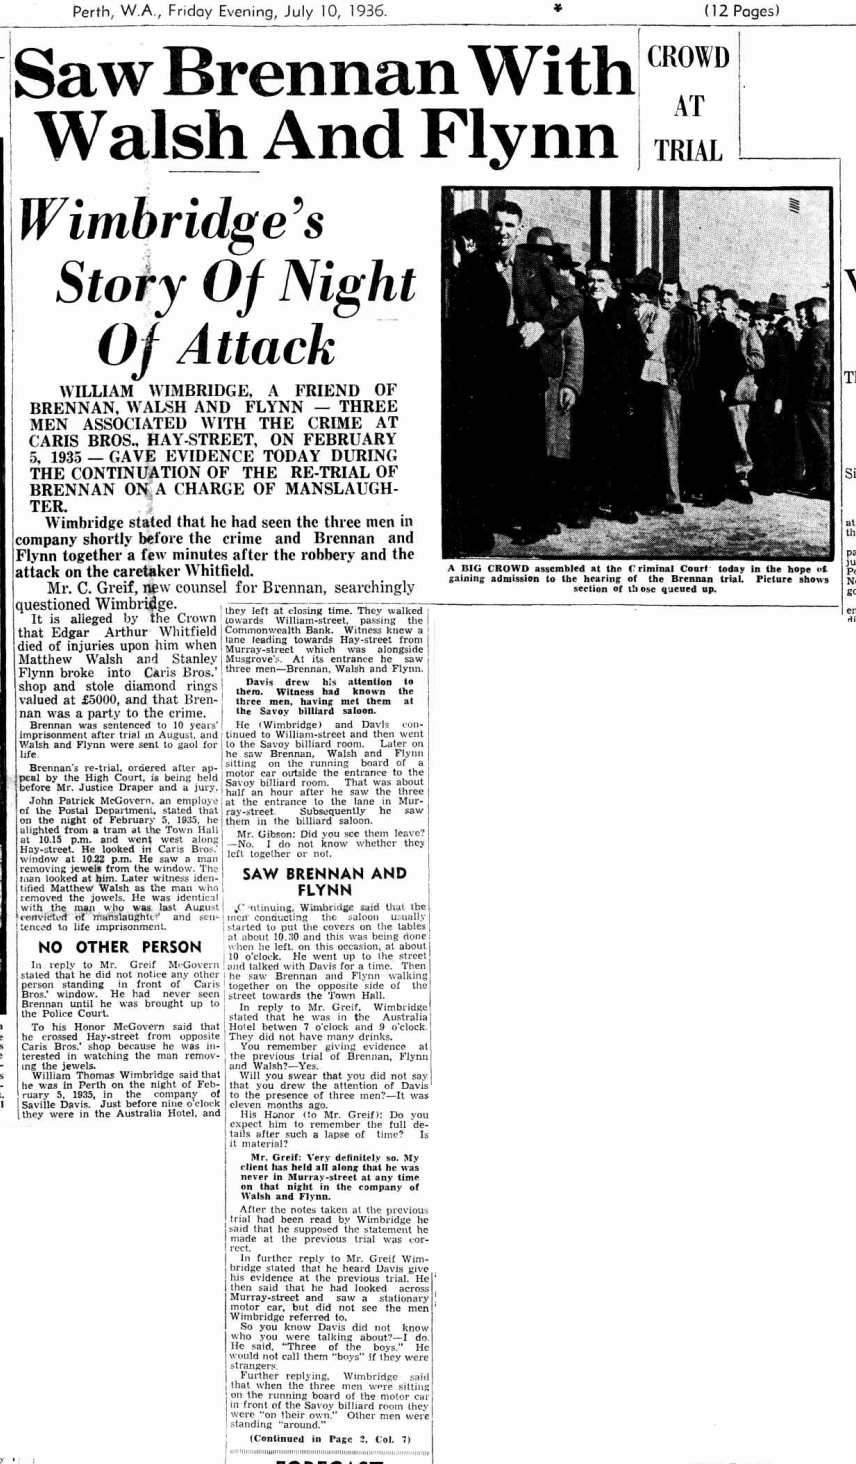
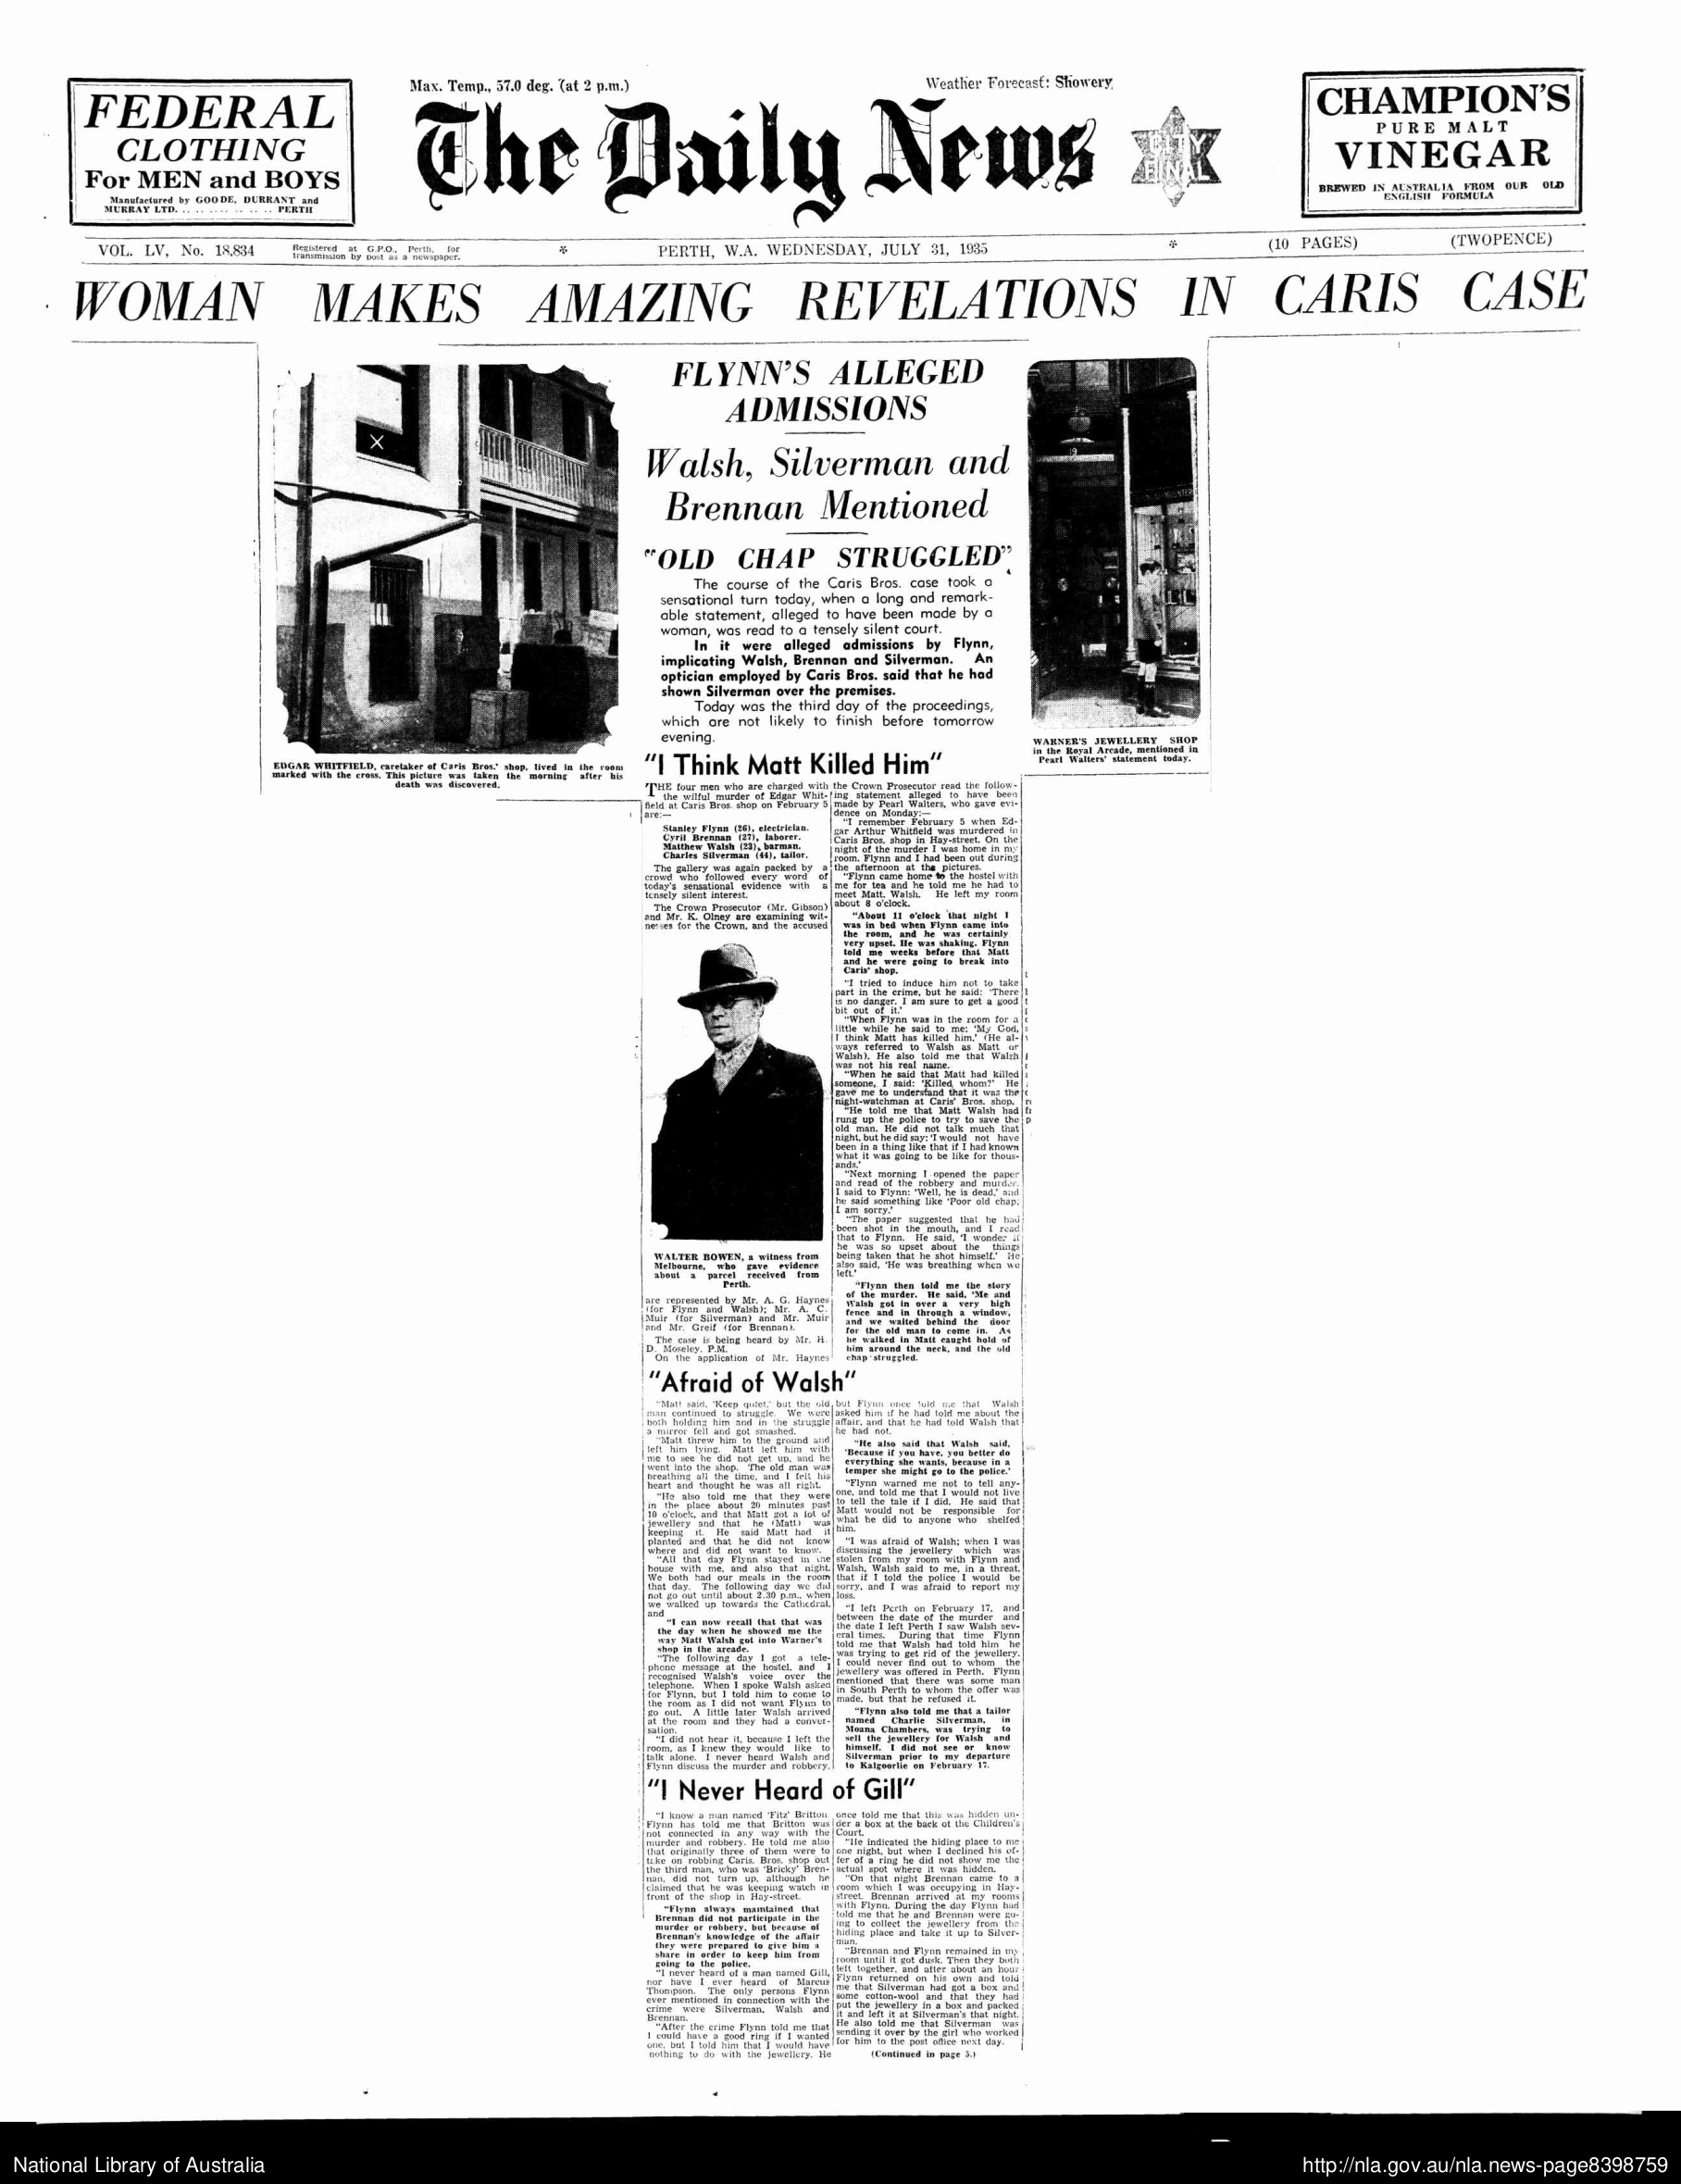
The trial was sensational, involving over forty witnesses and testimony from the married mistress of one of the defendants. Charles Silverman was said to have orchestrated the heist, having been acquainted with the men at his tailor shop in Moana Chambers, also on Hay Street.
Matthew Walsh and Stanley Flynn broke in, claiming they only intended to tie up the nightwatchman with a length of rope. During the struggle however, the men knocked over a large mirror which shattered atop the sixty-year-old Whitfield.
Flynn maintained he checked Whitfield’s pulse and was assured the guard was still alive before they left but to be safe, Walsh called in the anonymous tip to the police which led them to the scene. But whatever their intentions, Whitfield was dead by the time authorities arrived.
Details of the case were covered extensively in the newspapers, such as a postal worker who spotted Flynn during the robbery and that Walsh was seen burning bloodstained clothes after the fact.
The court also heard testimony from Flynn’s mistress, a married woman named Pearl Walters, who claimed she had tried to dissuade Flynn from the robbery and that when he heard that Whitfield had in fact died, he apologetically stated: “Poor old chap. I’m sorry.”
Walsh hid the jewels in the gardens near the Perth Children’s Court before fleeing to Melbourne, where he planned to sell them. Flynn claimed he had then retrieved the jewels with the assistance of Cyril ‘Brickie’ Brennan and Charles Silverman; the three of them prepared the jewels in a parcel, sent in Silverman’s name and addressed to ‘B. Williams, Melbourne’.
After receiving the jewels, Walsh’s spending spree aroused the attention of the Melbourne police. He was soon arrested, along with an associate of his, Keith Gill, who was eventually cleared of any involvement but claimed he had been abused by police for thirteen hours while under suspicion.
Attempting to explain why his name was on the parcel, Silverman claimed he had sent the parcel on behalf of a client of his tailor shop: ‘Snipey Evans’ from Kalgoorlie. Silverman claimed he sent one of his staff to run the errand and must have unthinkingly marked her employer, Charles Silverman, as the sender.
Unconvinced, the prosecutor suggested that ‘Snipey Evans’ never existed and instead produced telegrams sent from Walsh to Silverman’s tailor shop. These, Silverman claimed, were actually intended for Flynn who used his address to avoid Pearl discovering his second mistress in Victoria. Doubtful of these claims, the magistrate questioned whether the defendant thought it
odd that Flynn’s mistress went by ‘Bill Williams’. Silverman innocently replied that Flynn had told him it was the girl’s stage name.
Though implicated in the robbery by Flynn’s statement to the police, Brickie Brennan denied his involvement, claiming he had spent the night playing billiards at the nearby Savoy Hotel. Staff there testified to having seen Brennan that night but could not say for certain at what time. He was later accused on additional charges of having knowingly lived on the ‘immoral earnings’ of Pearl Walters, who frequented houses of ‘ill repute’ on Roe Street, making him a ‘rogue and vagabond’.
After forty-five minutes, the jury returned guilty verdicts for Brennan, Walsh and Flynn on the crime of manslaughter. The former was sentenced to ten years imprisonment with hard labour though he was acquitted a year later at a re-trial. Walsh and Flynn were each given twenty years. While Silverman was acquitted, he was swiftly re-arrested on new charges of complicity for which he was convicted and sentenced to six years’ imprisonment.
Almost ninety years after the fact, the Caris case continues to hint at mystery. Was Silverman a mastermind or a patsy? Did Walsh really kill Whitfield on accident? Was Brickie more involved than he claimed? And what of the potential fifth accomplice? Is the so called Snipey Evans fact or fiction?
- Morton, J., & Lobez, S. (2016). Gangland Robbers. Melbourne University Publishing, p.10
- “Saw Brennan With Walsh And Flynn” (1936, July 10). The Daily News (Perth, WA : 1882 - 1955), p. 1 (FINAL). < http://nla.gov.au/nla.news-article83369327 >, accessed August 2023
- “Woman Makes Amazing Revelations In Caris Case” (1935, July 31). The Daily News
(Perth, WA : 1882 - 1955), p. 1 (CITY FINAL). < http://nla.gov.au/nla.newsarticle85603051 > accessed August 2023 - “Law's Long Arm Dramatically Seizes Four Men!” (1935, July 6). Mirror (Perth, WA : 1921 - 1956), p. 1, < http://nla.gov.au/nla.news-article75718117 >, accessed August 2023
Object details
Registration label from Kukerin, blue, rectangular, dated 15 April 1935.
Envelope is addressed to 'Caris Bro's/Jewellers/Barrack Street/Perth/WA.'
Also attached: Centenary of Victoria 1834-1934 3d Prussian Blue; King George V 2d Red postage stamp(s); Black ink postmark from Kukerin (D26 type).